instagram takipci satin al - instagram takipci satin al mobil odeme - takipci satin al

bahis siteleri - deneme bonusu - casino siteleri

bahis siteleri - kacak bahis - canli bahis

goldenbahis - makrobet - cepbahis

cratosslot - cratosslot giris - cratosslot

Announcement

Collapse
No announcement yet.

Inside Doc's Machine Shop

Collapse
X
 
  • Filter
  • Time
  • Show
Clear All
new posts

    #91
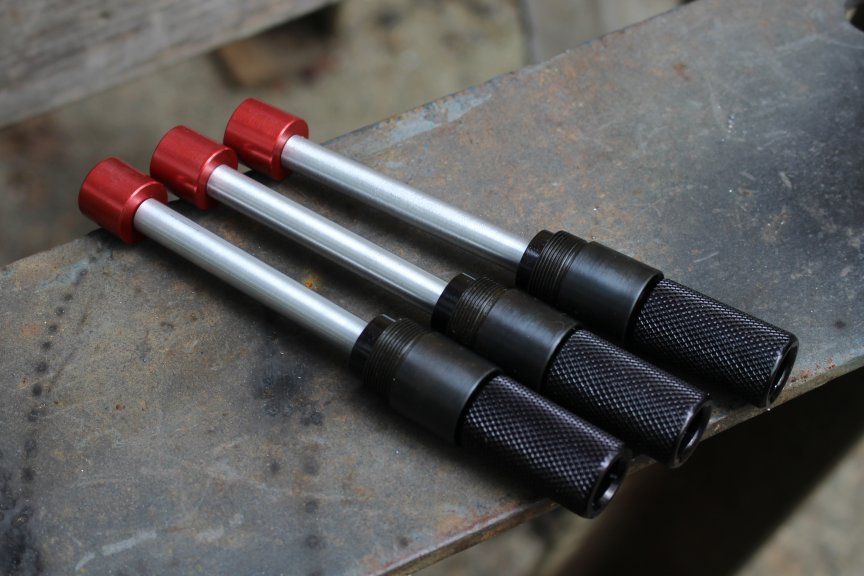
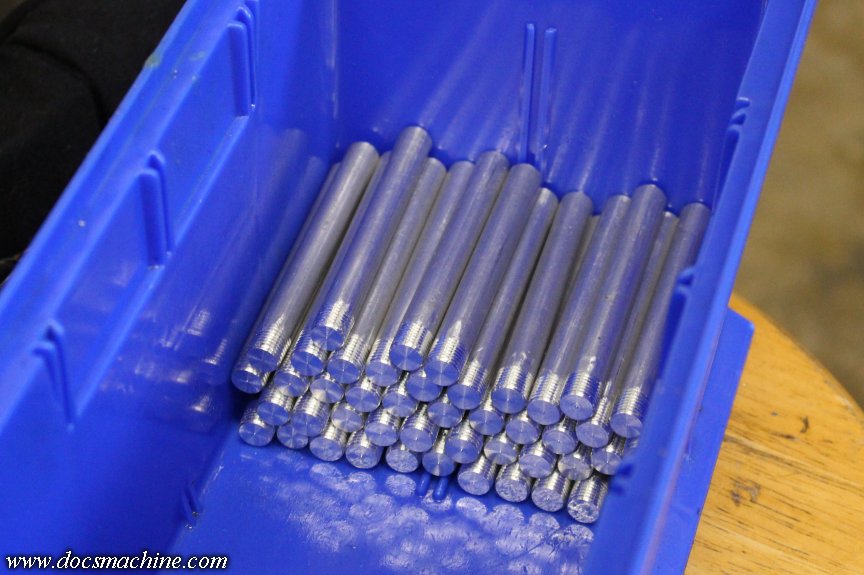
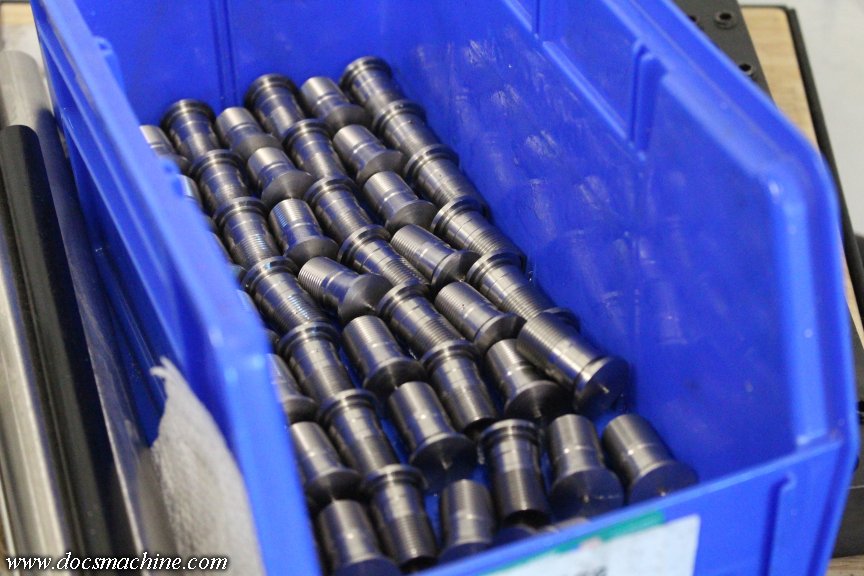
    And, for those of you that think I've been spending all my time on the beach sipping rum drinks, I have the first batch of extended Fast-Changers done!

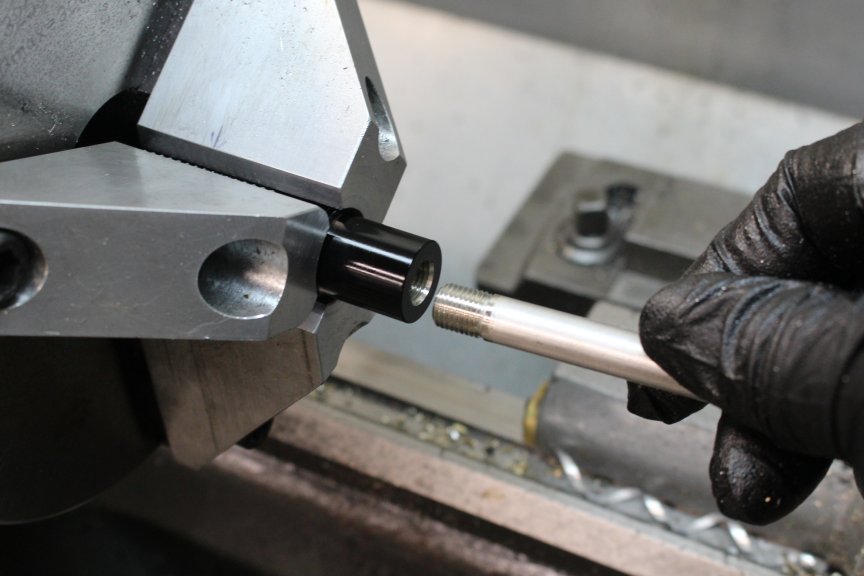
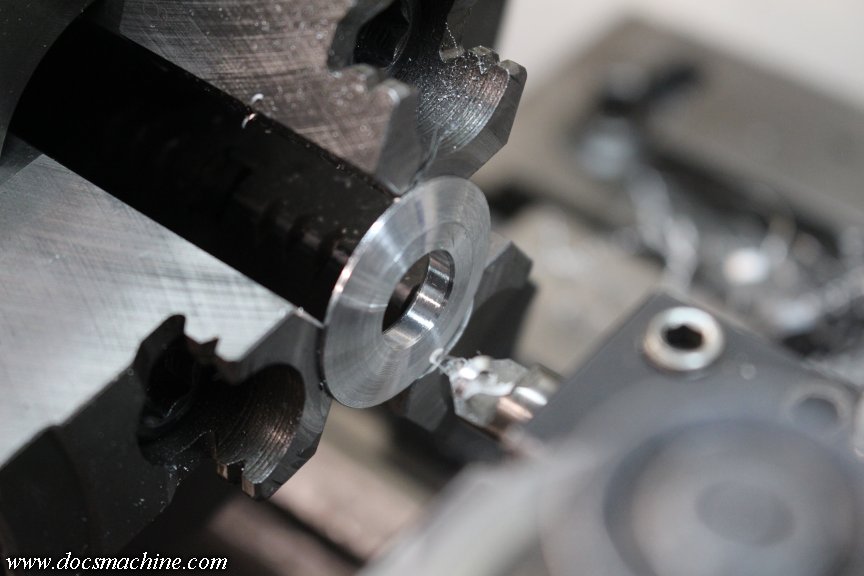
    Since I tend to overbuild things, I made the extensions out of full 3/8" rod, and threaded at that diameter:


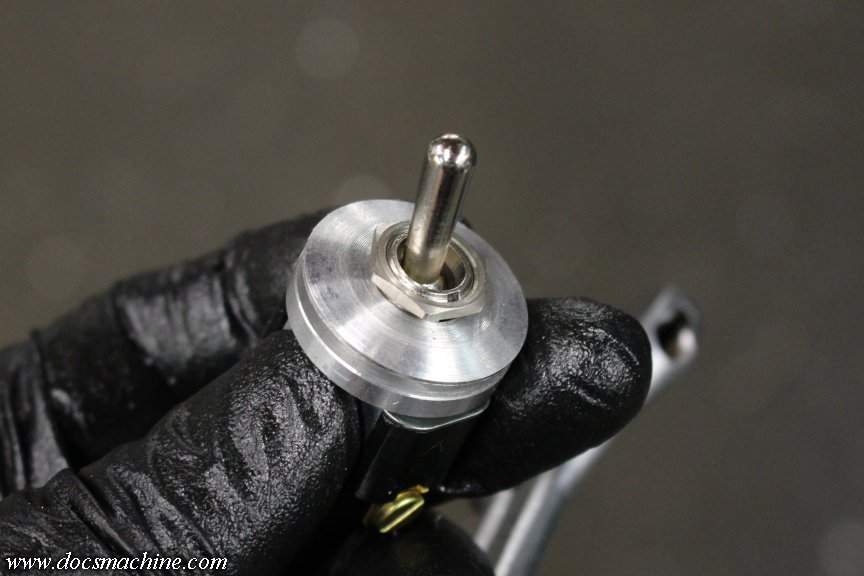
    Not gonna say they're 'unbreakable'- some of you lot could break a sledgehammer while trying to microwave a hotdog - but let's just say you'd have to work at it.

    So, these now fit- as far as I know- the PMI-1, PMI-2, and the P68-SC.


    I'll have 'em listed in the Dealer's section momentarily.

    Doc.
    Doc's Machine & Airsmith Services: Creating the Strange and Wonderful since 1998!
    The Whiteboard: Daily, occasionally paintball-related webcomic mayhem!
    Paintball in the Movies!

    Comment


      #92
      Still not dead! Just really, really busy. I know I'm way behind of some of your stuff (so what else is new?) but I'm still chewing my way through.

      Squeezed in a quick batch of those 'Changer extensions, which is so much quicker than doing it by hand...


      And while I still have these tools set up and zeroed in the machine, I've been trying to catch up on a few things I've been running low on- like my "Flattop" front-block bolts.


      And... a few other things.


      Also, for those that don't follow me over on the Guild, I built myself a "sump sucker":


      A sort of a "shop vac" specifically for pumping the cutting oil out of the machine sump, filtering it, and pumping it back in. The only issue being that some of the stuff in the oil is finer than the filter can catch- a supposed ten micron filter, meaning particles smaller than 0.00038".

      I may end up having to go with a centripetal filter or some such, I'm still working out the bugs. But with over $500 in cutting oil in this thing (times three machines!) I'm not just gonna change and dump it like you would in a car.

      Doc.
      Doc's Machine & Airsmith Services: Creating the Strange and Wonderful since 1998!
      The Whiteboard: Daily, occasionally paintball-related webcomic mayhem!
      Paintball in the Movies!

      Comment


      • superman

        superman

        commented
        Editing a comment
        This is a cool build.

      #93
      Have you thought about adding a magnet somewhere in the system to pick up your small particulate? Especially discharge side of the filter.

      Even if it's a slow process, do it once or twice to give you a cleaner product to start with.
      MCB Feedback

      Comment


      • superman

        superman

        commented
        Editing a comment
        I would imagine most of what Doc cuts is non-ferrous.

      • zinger565

        zinger565

        commented
        Editing a comment
        Good point. I forget sometimes living in the steel production world, haha

      • DocsMachine

        DocsMachine

        commented
        Editing a comment
        What Soupy said. I cut a bunch of steel making the 'collar' portion of the Fast-Changers, and stuck a heavy magnet to the bottom of the sump to try and pick up some of those, but everything else I've cut in this machine has been 90% aluminum, with most of the rest 303 stainless. (I've also done a small amount of brass and delrin. Which aren't magnetic either. )
        Doc.

      #94
      Possibly a good time to pump out a few Tantos? 😎

      Comment


      • DocsMachine

        DocsMachine

        commented
        Editing a comment
        Tantos are in the works, along with a ton of other things. You gents are welcome to swing by the shop and help out on occasion.

        Doc.

      #95
      When I was finishing up that run of parts last week, the "collet close" button on the OmniTurn stared feeling a little wonky. Seeming like it needed a little extra encouragement in order to operate.

      Until, in the last dozen or so parts, it stopped working altogether.

      Fortunately, there's a duplicate control toggle up on the main control panel, so it was no big to finish off the run. Once I was done, and had attended a few other things, I cracked open the "operator control box" to see what was up. The issue, with the right-hand red button, was obvious:


      What wasn't so obvious was the red zip-tie around the middle "E-Stop" button's switches, and the purpose of the black "blocks" under the left-hand green "collet open" button.

      I have not dug into either of those, as they're still working, but I suspect they may both be suffering the same problem:


      The little clips that hold the switch proper in place, which are surprisingly spindly, have cracked off. I suspect the middle one is cracked but holding, with the aid of the zip-tie, and the left one probably cracked, and somebody whipped up the expedient of jamming the two plastic blocks under it to hold it up.

      The maker of the switches, Baco, doesn't seem to carry that style anymore, though I found two switches and the clips on eBay. No good, though, since the clip was cracked. I also can't slip in some of those arcade buttons, without modification- the two side buttons (which when pressed simultaneously, start the cycle) are in the way of the thicker arcade body, and the hole in the case is 22mm, and the arcades are 1" (25mm.)

      The manufacturer of the machine sells all three, and for a not-absurd price, so I'll probably get them all before too long. But, I also need to order more tooling from them as well, and I figure I ought to get it all at once and try to save a little shipping.

      So in the meantime, I snuck over into a nearby secure installation, and salvaged a small momentary lever switch. What the heck, they probably won't need to "LAUNCH" anything for a while, anyway.

      I then spent a few minutes in the lathe making myself a couple of spacer-washers, like so:


      And voila! (which is a suburb just outside Voila-Voila, Washington.) A quick-and-dirty momentary switch repair, getting the machine back up and running, 'til I can place a parts order.


      The only worry is that the switch is not in the last bit 'sealed' against the cutting oil which inevitably drips off my gloves as I'm working the machine. As such, it may well have a short life- but then, it just has to work for a week or two 'til fresh parts come in, so that should be enough.

      Doc.
      Doc's Machine & Airsmith Services: Creating the Strange and Wonderful since 1998!
      The Whiteboard: Daily, occasionally paintball-related webcomic mayhem!
      Paintball in the Movies!

      Comment


        #96
        Ladies and gentlemen, I know it's not exactly a secret around here, but I... am an idiot.

        I have no money, no time, and no space in the shop... and I just bought my ninth lathe.


        Why? Because it was cheap enough I could actually kind of afford it, the seller rather deviously offered to deliver it, and worse, I'd kind of been thinking of something like this, anyway.

        A couple years back, I picked up that little Hardinge 'speed' lathe- which has since proven so useful, I've wished I'd bought the full-size DV-59 version of it, so I could also mount a small turret. Yes, I have the big Warner & Swasey turret, but there's been times I've needed to drill or power-tap small parts, with like 1/16" drills. The W&S is overkill, and also kind of too slow, for something that tiny.

        This one is a Rivett Series 60, which is nearly functionally identical to the Hardinge DV's; high spindle speed, takes 5C directly, uses a light turret, generally same size and weight, etc.


        I'll be honest and say I'd have rather had the Hardinge, as tooling for those is plentiful- in contrast, tooling of any sort for Rivetts in general is rather rare, and for a Series 60, even more so.

        In this case, I have the turret, and I think I can adapt a Hardinge X/Y slide, and that's really about all I'll need.

        One interesting part of this unit, is the spindle nose:


        That threw me for a minute, but in the tooling that came with it, was this cap and ring:


        This lathe, therefore, can take the same L-00 chucks as my Sheldon, which offers interesting options. I have a soft-jaw 3-jaw set up for the Sheldon, and there's been a few times I've wished I could use a turret on that one...

        One of the other more interesting bits in this machine, is the spindle drive:


        That's a motor-generator setup. One of those two motors you see is an AC 2HP 3-phase motor, and the other is a DC generator. DC voltage from that drives the DC spindle motor seen in the background. It's similar to, but not as sophisticated as, that of the older 10EEs. Today we'd use something like a big servo motor and electronic control, or a simple 3-phase with a good VFD, but this was how they did things in the 50s. (The estimated vintage of this machine.)

        The system is controlled by this big lever at the base of the headstock. You need to swap the physical pulleys to get into different ranges, but in that range, the lever switches speeds.


        Inside that switch, is what is essentially, I think, a big rheostat:


        I don't even pretend to know exactly how it works- but would be interested to hear an explanation. I'm hoping I can clean this knob and faceplate assembly, without damaging the electrics.


        Oh, the other part of my idiocy? I bought the machine almost sight-unseen, and didn't even bother trying it before starting to pull it apart.

        Pull it apart? Of course I did. I hated the color, and even if I didn't, the paint was in godawful shape anyway. A quick check with a razor blade showed the stuff practically falls off. I could blow sections off with compressed air.


        Thankfully, aside from the drive, it's a fairly simple machine, and didn't take long to fall apart.


        I'm not going to disassemble the electrics or the drive, so I'll have to hand-scrub and degrease the chassis, but at least here, the green seems to be holding well. Hopefully I'll just need to sand it, maybe fill a couple chips with spot-putty, then etch-prime and paint.

        Wish I had the time to make a video out of this...

        Doc.​
        Doc's Machine & Airsmith Services: Creating the Strange and Wonderful since 1998!
        The Whiteboard: Daily, occasionally paintball-related webcomic mayhem!
        Paintball in the Movies!

        Comment


          #97
          RE: Speed control

          The rheostat is just a big variable resistor. It's been like 10 years since I took my motors class, but your DC generator will put out a constant voltage (since the speed is constant from the AC motor). Depending on the setup, the rheostat is either directly cutting that voltage by being in series with your drive (high rheostat resistance = low motor voltage = slow speed) or it may be wired in parallel to control current (though I doubt this is the case as it results in full power draw all the time).

          Basically, if we're doing ye old water analogy for the flow of magic pixies, then your DC drive motor is a water wheel and the rheostat is a variable dam upstream.
          MCB Feedback

          Comment


            #98
            As I very vaguely understand it, the "rheostat" varies the ... strength? Of the generator's field windings. That in turn varies the output of the generator, which in turn varies the speed of the drive motor.

            It's similar to, but not the same as, how the motor/generators of the old Monarch 10EEs worked. Those were more complex than what I have- some of the old Monarchs actually used big vacuum tubes as part of the control circuitry- but they let those machines go from something like 200 RPM all the way up to 3K or 4K RPM, with just one belt-range change.

            Doc.
            Doc's Machine & Airsmith Services: Creating the Strange and Wonderful since 1998!
            The Whiteboard: Daily, occasionally paintball-related webcomic mayhem!
            Paintball in the Movies!

            Comment


              #99
              Had very little time to spare, today, but still had to do something on it. I'm not kidding when I say our summers are way too damned short. Summer itself is really just three months long -June, July and August- and of those, maybe a third of them are warm, dry days where it's actually pleasant to do something outdoors. I have a few days- 'til late this weekend, according to the forecasts- 'til it rains, so I'm hoping I can at least get the base cabinet cleaned, painted and into the shop.

              Anything after that is easy enough to bring inside if it's gonna sprinkle.

              Anyway, all I did today was pop the drip tray off the top of the cabinet, and scrub down what I could, that didn't risk getting water on the electricals.


              The right-hand storage cabinet cleaned up nicely, though I don't plan to actually paint in there. The 'footwell' is pretty well scrubbed out- some previous owner painted over some swarf and mud in the corners - and the right end and part of the back is pretty clean.

              When I next have time, I hope to sand those faces lightly and at least prime them.

              While I was doing that, periodically hosing it with Purple ZEP, letting it soak, scrubbing, then hosing carefully, I'd take turns hitting the bed casting with a needle scaler.


              I started out trying to use paint stripper, but the modern non-methylated stuff doesn't seem to work very well. I should have just started with the needler.

              The only drawback of that is it strips the filler too- although to be honest, the filler can soak up the stripper, and 'bubble' the paint later, if it's not well-rinsed. Six of one, and all that...

              If it's too rough after I sand it, I can give it a skim coat of filler like I did on the little Hardinge.

              Anyway, after switching back and forth a bit, I had the casting pretty well cleaned off- the white is just traces of the filler.


              With luck, maybe I can have these two pieces painted (okay, three, with the drip tray) and reassembled by the weekend.

              Doc.​
              Doc's Machine & Airsmith Services: Creating the Strange and Wonderful since 1998!
              The Whiteboard: Daily, occasionally paintball-related webcomic mayhem!
              Paintball in the Movies!

              Comment


                Here's an example of one of those paper tags inside the cabinets. This is the worse of the two:


                I have the full-res, of course, and at some point I'll try to clean it up digitally. On this one, one corner was loose, but I tore it slightly trying to go any further. I may try to dribble a little alcohol on it, either to loosen the adhesive, or to see if the staining can wash out a little.

                It basically explains how some rubber isolating feet need to be installed after first delivery. On the right, it suggests the generator brushes can be inspected by removing the vented end cover. I'll probably do that before too long, just to see what kind of shape the brushes are in. (It's a Blador power unit, I wonder if they'd still have brushes...)

                Also, not that we really needed it, here's proof of the repaint:


                The brighter green on the left is the repaint, the duller green is the original factory color. Whoever did the repaint often applied it over dried oil and coolant stains, and it basically fell right off.

                Normally I'd strip something like this down to bare metal- or close to it, anyway. But time is short, and I also don't want to have to try and remove all the drive motors and electrics.

                As it is, I spent a good couple of hours scrubbing, degreasing and rinsing. This will not be one of my best-ever paintjobs, but the more time spent now, the longer it'll last.


                Finally, scrubbed, scraped, rinsed, wiped, degreased and rinsed again.


                And, while I was wrapping the motors against drips and overspray, I noticed the first mechanical issue:


                It's hard to tell in that pic, but that black bar in the center is the key to the shaft for that pulley. It's walked out, and stopped only by hitting the cabinet wall, where it's scored a small circle.

                Obviously, before I light this thing up for the first time, we'll need to address that.

                Anyway, with a few bits of masking paper here and there, I then spent a good long while sanding anything I could reach:


                After blowing off all the dust, a can and a half of spray self-etching primer...


                And finally, the first coat of "Lathe Grey" enamel.


                As I said, this will not by any means be the best paintjob I've ever done, but personally? It already looks roughly a million percent better.

                (I really hated that green.)

                Doc.​
                Doc's Machine & Airsmith Services: Creating the Strange and Wonderful since 1998!
                The Whiteboard: Daily, occasionally paintball-related webcomic mayhem!
                Paintball in the Movies!

                Comment


                • Cal440

                  Cal440

                  commented
                  Editing a comment
                  Looks good Doc

                Hey Doc,
                Any update on those L stocks you bent up a few pages back.... late july? 🤞🤞🤞🤞 want complete my Comp with one in time for Bacci Mountain!

                Comment


                • DocsMachine

                  DocsMachine

                  commented
                  Editing a comment
                  Oh? I thought I'd covered all the outstanding requests. Did you send me an email or a PM?

                  Sorry, sometimes I feel like I'm juggling sixteen flaming chainsaws- and some days I'm probably lucky to remember pants.

                  Hit me again and I can get one heading your way- or were you waiting for the next batch of anno'd ones?

                  Doc.

                I know it doesn't look that much different from the last photo, but here it is with the second coat:


                Later this weekend, when it's decently dry (it's only in the mid-50s) I'll hire some help and get it rolled into the shop. This was the big piece- the rest of it is small enough I can take care of it at my leisure, inside or out, rain or shine.

                Question for you lot: I'm considering removing the VFD (a recent addition by the previous owner) and running it on straight 3Ph out of the 10HP rotary converter. I'm told the drive can "backfeed" on fast braking or reversing, and trip out the VFD. The rotary would avoid that.

                To do that, I'd need to refit a disconnect at the lathe end, so I'm looking for a switch something like this:


                I can find conventional 3-ph switches just about anywhere, I'm just wondering if I can dig up an "old style" that looks something like this one. Just for aesthetics, of course- if I can't find one, I'll go with a modern Allen-Bradley from McMaster or something.

                Doc.​
                Doc's Machine & Airsmith Services: Creating the Strange and Wonderful since 1998!
                The Whiteboard: Daily, occasionally paintball-related webcomic mayhem!
                Paintball in the Movies!

                Comment

                Working...
                X