instagram takipci satin al - instagram takipci satin al mobil odeme - takipci satin al

bahis siteleri - deneme bonusu - casino siteleri

bahis siteleri - kacak bahis - canli bahis

goldenbahis - makrobet - cepbahis

cratosslot - cratosslot giris - cratosslot

Announcement

Collapse
No announcement yet.

Der Cockermaker Part 2: The return of Der Cockermaker

Collapse
X
 
  • Filter
  • Time
  • Show
Clear All
new posts

    Der Cockermaker Part 2: The return of Der Cockermaker

    Hello MCB,

    I recently got Der Cockermaker as a "not quite done but working" project gun.
    The first part of the build has been documented, so I thought i would carry the torch ...

    Rainmaker build thread: POP Contest - Rainmaker's entry

    Here is how i received the marker:
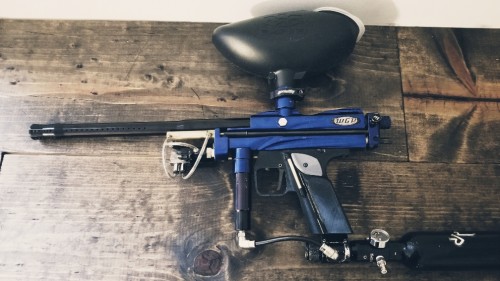


    There are a few thing i would like to do before considering it "done":
    - make it simpler to take the back block off
    - replace the board with a Morlok
    - Ill find something ...

    The board replacement would allow me to accomplish a few things. First i would be able to adjust dwell, which is not currently available on the RM board, then i would be able to add eyes, which the body is drilled for. I would stuff all this inside an electro frame (preferably blue) for good measure ...

    Thanks for watching,
    X
    Love my brass ... Love my SSR ... Hard choices ...

    XEMON's phantom double sided feed
    Keep your ATS going: Project rATS 2.0
    My Feedback

    #2
    Originally posted by XEMON View Post
    - make it simpler to take the back block off
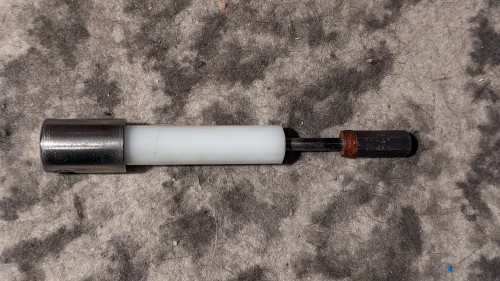
    The back block - bolt spacer was affixed to the back block, which meant it had to be taken out to be able to remove the back block.
    To correct that, the spacer needed to be fastened to the hammer, so i machined a piece of delrin and press-fit it into the spring groove of the hammer:


    Now i can remove/adjust the back block just like on a regular cocker:


    Love my brass ... Love my SSR ... Hard choices ...

    XEMON's phantom double sided feed
    Keep your ATS going: Project rATS 2.0
    My Feedback

    Comment


      #3
      Happy to see this project will continue to evolve
      The first post by Rainmaker was already fun to watch and I think this project is now a MCB fan favorite
      💀Team Ragnastock💀

      Comment


        #4
        Love what you've got going here, XEMON!

        She and her sister are definitely in capable hands
        Rainmaker's feedback: https://www.mcarterbrown.com/forum/b...maker-feedback

        Comment


        • XEMON

          XEMON

          commented
          Editing a comment
          Thanks, I have a good base to start with 👍

        #5
        I am flifloping between a blue shocker frame or a chrome race frame (from a member here) ... Also got my eyes on a freeflow but I doubt I'll have the highest bid 😅

        ​​​​​​

        Love my brass ... Love my SSR ... Hard choices ...

        XEMON's phantom double sided feed
        Keep your ATS going: Project rATS 2.0
        My Feedback

        Comment


          #6
          Frame came in, now I need to cut a few things and put the electronic inside 👍

          Here it is layed out (not bolted):
          Click image for larger version

Name:	PXL_20220421_225844714.jpg
Views:	395
Size:	1.52 MB
ID:	262623
          Love my brass ... Love my SSR ... Hard choices ...

          XEMON's phantom double sided feed
          Keep your ATS going: Project rATS 2.0
          My Feedback

          Comment


            #7
            That shocker frame just looks right on there
            💀Team Ragnastock💀
            Ion Long Rifle
            Spyder Pump
            BST Feedback
            Brass Thread

            WTB Sheridan Parts

            Comment


            • XEMON

              XEMON

              commented
              Editing a comment
              The ano is nearly a perfect match ...
              Gonna cut a groove on the he top "race frame style" for the solenoid wires

            • JeeperCreeper

              JeeperCreeper

              commented
              Editing a comment
              This makes me wanna mess with the Poo CVO. Haven't touched it since I got a real one

            #8
            I think I got the electronic layed out.
            Morlok on the top and screen bellow the battery on the left.
            Click image for larger version

Name:	PXL_20220425_133559971.jpg
Views:	422
Size:	917.6 KB
ID:	264148
            Click image for larger version

Name:	PXL_20220425_133618747.jpg
Views:	413
Size:	959.9 KB
ID:	264149
            Love my brass ... Love my SSR ... Hard choices ...

            XEMON's phantom double sided feed
            Keep your ATS going: Project rATS 2.0
            My Feedback

            Comment


            • XEMON

              XEMON

              commented
              Editing a comment
              Unless i go with a li-po ...

              Edit: if i go Li-po i may try to make it clean and use clear panels ...
              Last edited by XEMON; 04-25-2022, 01:21 PM.

            #9
            Thanks BrickHaus for the goodies.
            Der Cockermaker will not be blind anymore and will be cool doing it 😎

            Click image for larger version

Name:	PXL_20220428_131914940.jpg
Views:	338
Size:	2.55 MB
ID:	265351 ​​​​​​​
            Love my brass ... Love my SSR ... Hard choices ...

            XEMON's phantom double sided feed
            Keep your ATS going: Project rATS 2.0
            My Feedback

            Comment


              #10
              Back to back update ...

              Here is the groove in the frame:
              Click image for larger version

Name:	PXL_20220428_154242426.jpg
Views:	339
Size:	563.0 KB
ID:	265371
              And with the wire:
              Click image for larger version

Name:	PXL_20220428_154259645.jpg
Views:	327
Size:	912.1 KB
ID:	265372
              Love my brass ... Love my SSR ... Hard choices ...

              XEMON's phantom double sided feed
              Keep your ATS going: Project rATS 2.0
              My Feedback

              Comment


                #11
                Originally posted by XEMON View Post
                I think I got the electronic layed out.
                well ... went a totally different way ...
                got teh bottom half of the electronic ready, Morlok pin de-soldered and new wiring soldered in place. Lipo, screen and board installed.

                To do:
                - take picture
                - find a way to attach trigger microswitch
                - figure out eye wiring (if anyone got a pinout laying around ...) and test them
                - find a way to attach the eye
                - wire solenoid
                - Take some more pics
                - GO PLAY!!!

                Love my brass ... Love my SSR ... Hard choices ...

                XEMON's phantom double sided feed
                Keep your ATS going: Project rATS 2.0
                My Feedback

                Comment


                  #12
                  Here's a thought:

                  How about a weak-ish spring pushing the bolt forward?
                  • Keeps the marker neat and compact while degassed
                  • You could probably turn down the lpr pressure slightly for the same Velocity.


                  If it doesn't have the [F] i don't want it. - Europoor

                  Comment


                  • XEMON

                    XEMON

                    commented
                    Editing a comment
                    Not sure how to mount it, it would have to mounted on teh ram shaft to keep teh back block forward.

                  • devilzcall
                    devilzcall commented
                    Editing a comment
                    Probably around the delrin spacer, but it would make disassembly a lot more cumbersome

                  • XEMON

                    XEMON

                    commented
                    Editing a comment
                    That wont prevent the back block from flopping around when de-pressurized ... the hammer, back block and bolt are all one solid piece, they all move together.

                  #13
                  Hopefully you can get the Morlock to power the 2 solenoids off of the LiPo voltage. I’ve had issues in the past with it bringing up the 3.7 volts to power 2 noids at high rate of fire.

                  edit - just realized you’re running 1 solenoid. Sorry to litter your thread.

                  Comment


                  • XEMON

                    XEMON

                    commented
                    Editing a comment
                    no problem, good to know for future projects.

                  #14
                  Originally posted by XEMON View Post
                  To do:
                  - take picture
                  Right side, the battery side:
                  Click image for larger version

Name:	PXL_20220429_034716755.jpg
Views:	312
Size:	1.61 MB
ID:	265710

                  Left side, the screen and power switch:
                  Click image for larger version

Name:	PXL_20220429_034744970.jpg
Views:	315
Size:	1.39 MB
ID:	265711

                  Also re-purposed the back switch as the sleep switch (no idea what it does on a shocker):
                  Click image for larger version

Name:	PXL_20220429_034801296.jpg
Views:	303
Size:	1.73 MB
ID:	265712
                  Love my brass ... Love my SSR ... Hard choices ...

                  XEMON's phantom double sided feed
                  Keep your ATS going: Project rATS 2.0
                  My Feedback

                  Comment


                    #15
                    Originally posted by XEMON View Post
                    To do:
                    - find a way to attach trigger microswitch
                    In process, but I got a plan 😅

                    Originally posted by XEMON View Post
                    - figure out eye wiring (if anyone got a pinout laying around ...)
                    Got somewhere ... This is not an led receiver like I originally thought ... It's an non phototransistor.

                    Here is a pinout (view is with the lead facing you)
                    Click image for larger version

Name:	Screenshot 2022-05-02 083719.jpg
Views:	328
Size:	15.0 KB
ID:	266805

                    Had to significantly drop the sensitivity of the board to detect anything (my testing with ion eyes didn't need sensitivity adjustment). Then had to drop it some more to account for the ball rolling in the breach a bit ... So started at 65, and dropped it all the way to 5 ... Will see how it works in game.


                    Click image for larger version  Name:	PXL_20220502_154732599.jpg Views:	0 Size:	2.12 MB ID:	266804

                    Next:
                    Originally posted by XEMON View Post
                    - find a way to attach the eye
                    Anyone know whats the screw threads for the eye cover?
                    Love my brass ... Love my SSR ... Hard choices ...

                    XEMON's phantom double sided feed
                    Keep your ATS going: Project rATS 2.0
                    My Feedback

                    Comment


                    • Jordan

                      Jordan

                      commented
                      Editing a comment
                      I think the eye cover bolt is 4-40.
                  Working...
                  X