Alright... It's not fully complete, but I cant take it anymore. Time to spill dem beans.
First off all I would like to thank mueller for initially discovering these donor poo piles. More importantly, I'd like to thank Trbo323 and his amazing family for going out of their way to collect these, organize the POP, and ship them all to us for extremely reasonable prices.
Details of the initial spotting of these can be found here https://www.mcarterbrown.com/forum/p...paintball-guns
So for those not in the know, The rules set forth by Trbo were as follows:
"RULES! (kind of)
I'm calling this the "cheaters always prosper" poo contest, read on.
Here's the scenario, you are 17, got your first job, a friend of yours went out and got himself a super sick 98c , you however are given this beat up Carver one. You could go buy yourself the same 98c since you just got your first, huge, $150 paycheck, but where's the fun in that? You can build something better and smoke his ass on the field. Will it be fair? Probably not but will you care? Hell no
rule 1) price of your first Carver one is free
Rule 2) scrap parts you have on hand are also free
Rule 3) everything after that is counted
Rule 4) a 98c is $150, so that is your limit you are aiming to be under
You are to create something not just better than a 98c but "cheaters always prosper" better. Full auto? Hell yes, more than one barrel? For sure. First strike? Absolutely. Basically what I'm getting at is a Carver one that is still mechanical semi auto better have something outstanding going on to win this
As such, I'm not going to rule out cheating in other ways, want to bribe me for early info (maybe I have some, maybe I don't, mums the word, I am cheap though) or choice parts? Im game (counts to your total though) does xemon want to send some "free" parts to brickhaus and brickhaus will also coincidentally send some "free" parts to xemon? Totally in. Does 17 year old you also happen to be selling a laptop? $150+laptop sale price (yes you actually need to sell something, no pretending)
Take the underhanded path of adding an under barrel launcher that was "borrowed" from Walz while he was not looking. Anything that will give you a questionable advantage on the field while still being (mostly) safe to actually be on the field is fair game.
PRICE= $20 first marker
Markers 2,3,4-$10 each
I can get 4 in one box, if you want more than 4 the pricing will start over at marker 1 again"
I initially opted for 2 shooters as I was going to make a double barrel, butI decided to build a closed bolt pump since it seems most of the competition was going for a double, tripple, or even quad barreled entries.
Myrkul said I should make it skeletonized, I agreed. I then reached out to my friends of MCB for free and or cheap spare parts.
Myrkul came through right away with a beautiful red aluminum power tube that begs to be shown off. He also included a cyclone, hopper, and a rear cocking part. I wasnt able to utilize those on this build. He has also offered for me to get my marker powdercoater by family connections. He has been a huge factor in my early motivation for the build.
autococker04 offered a 98C AA back for free next time we cross paths. I have a few freak compatible tips to add to the mix. I owe him a big thanks also.
So my box arrives inside are these 2x project loosely packed, and a single packet of Heinz Mayo. I have 2 unfinished projects in front of this poo build, but they quickly got pushed aside. These fine specimines are screaming to be worked on, Mykul's brainstorm sesh fresh on my heels, and my competitavive nature all kick me into overdrive.
I went down to the basement to crack these bad boys open. The first one had rusted bolts. I oiled the nuts and let it sit..... It hasnt been touched since. I opened the main specimine up.

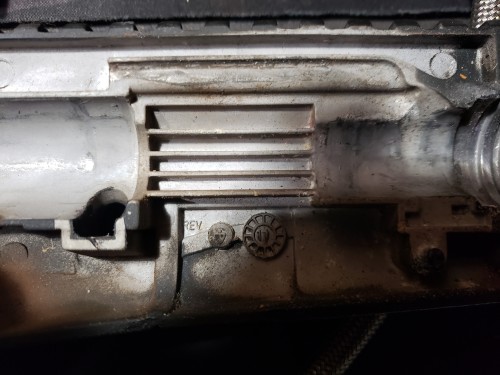
Alright, a 98 clone with a .50 cal bolt, and some typical tippmann grime. *cracks knuckles*.
two odd observations.. first is, they put these grooves along the bolt in late model tippmanns. I assume for paint shell to fall into if you chop a ball.
Second, I got 50 cal kit number 333. Must be a sign that Velcor smiles upon this project.

**Disclaimer: Though I have a lathe, I did all of the work on this so far with hand tools.**
The dremel comes out, and many hours of dremeling, filing, drilling and cutting over a few days time. Obviously I have to tackle this sparodically as life gets into the way often, I get the general idea of my skeleton pattern using natural body recesses.


I got cold for a few days, then my care package form Mykrul arrived. Man that read anodizing really lookg nice.. que whirring noises!!!

I decided the top picatinny rail had to go.
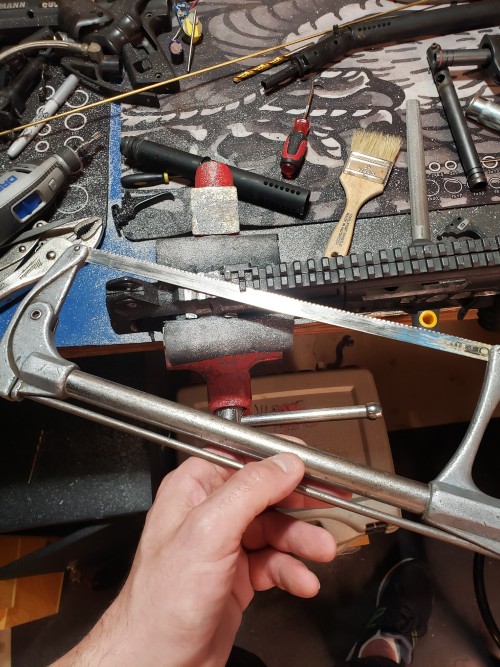

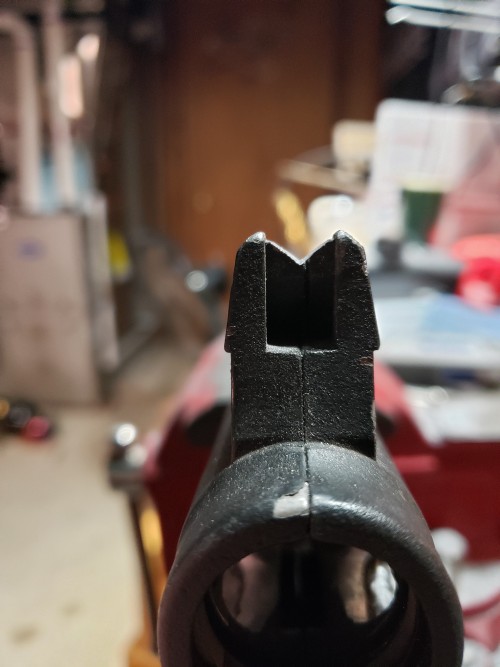
I got crazy and hacked the huge front sight off, files a better V into the rear sight, and turned town a 3d printer nozzel for a front sight. I epoxied the nozzel to the front post.


Onto the valve. My project is going to require some farmer engineering.
First I dremeled the corners of the air passages to help with the air redirection internal of the valve.
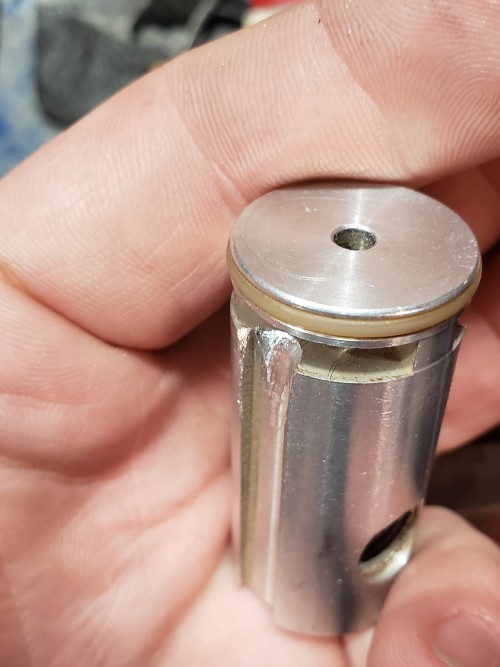
Next big hurdle in the valve. I need to kill blowback air. I found this perfect little brass doojiggy in a box of tool steel in my basement. I JB welded the doo jiggy into the blowback passage. and let it sit for a day. I also figure the 45* edge of the doojiggy will make a nice "jet" in the valve.

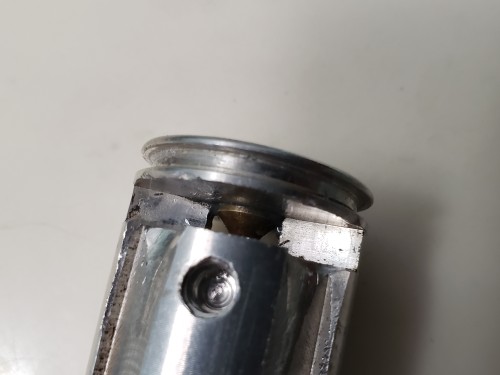

while the JB weld sets, I need to get the taper out of the valve pin. I happen to have a honing stone in my machinist stuff, so I used a hand drill, oil, and time to hone the pin down. I did use a flap wheel to get the high spot a ways down and save time.


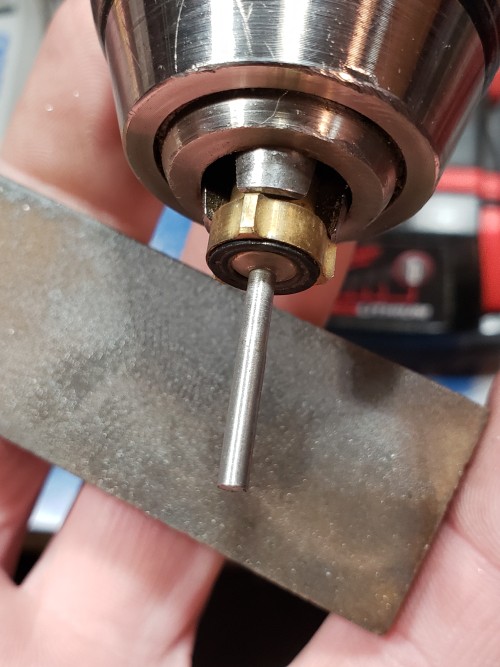

This process took a lot of tries and re fits. oil, stone, turn turn, check, oil, stone, turn.
FINALLY after many hours I had the pin to a nice .0970"
I have a drill bit that measures .0965. I figure I can poke the hole with this, and stone the valve a little more until I get a tight fit.


The next day, I snuck down to the basement at 2:30 am, and drilled the doojiggy jet plug thingy, first with a tiny drill bit. then with my .0965 drill bit.
Fitted the valve from the front, but it bound form the ID of the valve body. I seem to have drilled my hole slightly crooked.

I determined, I would knock one of the valve fins off, and clock the valve pin to match my error. This allows the valve to deviate side to side more.

and Viola, it works!!!


Now My minds racing. how am I going to feed this beast with air? I consult with the tote of never ending remote lines. Oh tote, I wish I had a cool way to make my poo build direct air input.
Then the tote started to rumble. and this old school microline with a huge hex ASA appeared.

It was decided, the fat must be trimmed.


I put it quickly back together to ensure it holds air, and as you can see....
I dug my old V1 tippmann a5 bolt out of a bin. I recall upgrading years ago to the lower weight hammer for less recoil.. Well for this build a heavy hammer= dwell. and I assume I can get a super light hammer spring once I get on a chrono for testing. It also lacks the cocking lug which is better for astethics


*que more whirring noises*

Fast forward a few days. Life stopped all production once again.
I've been trying to brain my way around sledding the bolt linkage and seperating the hammer linkage. I knew it would require some iteration of an a5 cocking knob, but with a poo like spin. I made a few failed iterations of this from other parts, but eventually I fashioned this assembly out of scrap parts form my Walz built. The brass bar I hacked off, and filed square. then drilled and tapped to hold dthe bolt. The linkage is actually stainless hinge rod I had at work. The aluminum plate is 1/8" backplane scrap from work. but all in all it works pretty well!!!
The brass block is tapped 4-40 for the counter sunk bolt. The set screw is 10-32, and it what is affixing the bolt to the sled.

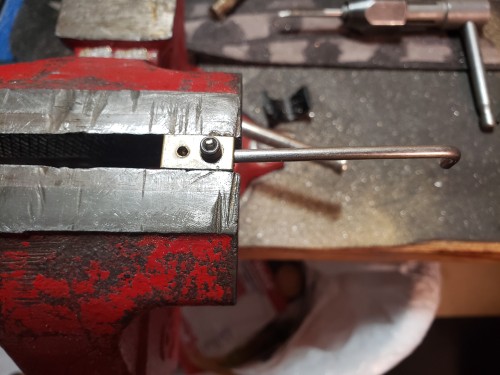


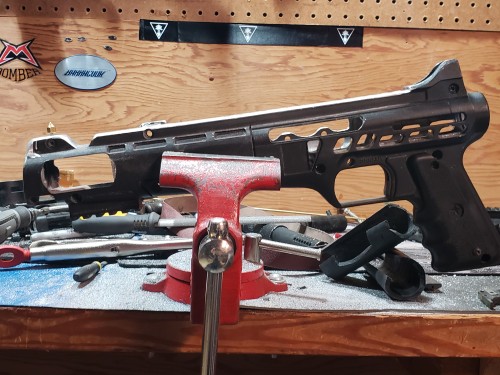
I excitedly put it back toghether and loaded a 12 gram. Here is how she looks today. Note the rosewood grip on the right side will need to be modified to fit, so I'm still deciding on stock grips vs the rosewoods. Feel free to provide feedback.


It's far from finished, I still have to work on designing and printing a cram and jam for it, and I want to make a pump handle that mounts to the bottomline rail to cycle the gun, but I could technically field it today.
It's no true test, but I was able to cycle 47 shots on the valve with a fresh 12ie before it was dead. I hope I am close to 30 good shots all said and done..
Stay Tuned!!!


First off all I would like to thank mueller for initially discovering these donor poo piles. More importantly, I'd like to thank Trbo323 and his amazing family for going out of their way to collect these, organize the POP, and ship them all to us for extremely reasonable prices.
Details of the initial spotting of these can be found here https://www.mcarterbrown.com/forum/p...paintball-guns
So for those not in the know, The rules set forth by Trbo were as follows:
"RULES! (kind of)
I'm calling this the "cheaters always prosper" poo contest, read on.
Here's the scenario, you are 17, got your first job, a friend of yours went out and got himself a super sick 98c , you however are given this beat up Carver one. You could go buy yourself the same 98c since you just got your first, huge, $150 paycheck, but where's the fun in that? You can build something better and smoke his ass on the field. Will it be fair? Probably not but will you care? Hell no
rule 1) price of your first Carver one is free
Rule 2) scrap parts you have on hand are also free
Rule 3) everything after that is counted
Rule 4) a 98c is $150, so that is your limit you are aiming to be under
You are to create something not just better than a 98c but "cheaters always prosper" better. Full auto? Hell yes, more than one barrel? For sure. First strike? Absolutely. Basically what I'm getting at is a Carver one that is still mechanical semi auto better have something outstanding going on to win this
As such, I'm not going to rule out cheating in other ways, want to bribe me for early info (maybe I have some, maybe I don't, mums the word, I am cheap though) or choice parts? Im game (counts to your total though) does xemon want to send some "free" parts to brickhaus and brickhaus will also coincidentally send some "free" parts to xemon? Totally in. Does 17 year old you also happen to be selling a laptop? $150+laptop sale price (yes you actually need to sell something, no pretending)
Take the underhanded path of adding an under barrel launcher that was "borrowed" from Walz while he was not looking. Anything that will give you a questionable advantage on the field while still being (mostly) safe to actually be on the field is fair game.
PRICE= $20 first marker
Markers 2,3,4-$10 each
I can get 4 in one box, if you want more than 4 the pricing will start over at marker 1 again"
I initially opted for 2 shooters as I was going to make a double barrel, butI decided to build a closed bolt pump since it seems most of the competition was going for a double, tripple, or even quad barreled entries.
Myrkul said I should make it skeletonized, I agreed. I then reached out to my friends of MCB for free and or cheap spare parts.
Myrkul came through right away with a beautiful red aluminum power tube that begs to be shown off. He also included a cyclone, hopper, and a rear cocking part. I wasnt able to utilize those on this build. He has also offered for me to get my marker powdercoater by family connections. He has been a huge factor in my early motivation for the build.
autococker04 offered a 98C AA back for free next time we cross paths. I have a few freak compatible tips to add to the mix. I owe him a big thanks also.
So my box arrives inside are these 2x project loosely packed, and a single packet of Heinz Mayo. I have 2 unfinished projects in front of this poo build, but they quickly got pushed aside. These fine specimines are screaming to be worked on, Mykul's brainstorm sesh fresh on my heels, and my competitavive nature all kick me into overdrive.
I went down to the basement to crack these bad boys open. The first one had rusted bolts. I oiled the nuts and let it sit..... It hasnt been touched since. I opened the main specimine up.

Alright, a 98 clone with a .50 cal bolt, and some typical tippmann grime. *cracks knuckles*.
two odd observations.. first is, they put these grooves along the bolt in late model tippmanns. I assume for paint shell to fall into if you chop a ball.
Second, I got 50 cal kit number 333. Must be a sign that Velcor smiles upon this project.


**Disclaimer: Though I have a lathe, I did all of the work on this so far with hand tools.**
The dremel comes out, and many hours of dremeling, filing, drilling and cutting over a few days time. Obviously I have to tackle this sparodically as life gets into the way often, I get the general idea of my skeleton pattern using natural body recesses.


I got cold for a few days, then my care package form Mykrul arrived. Man that read anodizing really lookg nice.. que whirring noises!!!

I decided the top picatinny rail had to go.


I got crazy and hacked the huge front sight off, files a better V into the rear sight, and turned town a 3d printer nozzel for a front sight. I epoxied the nozzel to the front post.


Onto the valve. My project is going to require some farmer engineering.
First I dremeled the corners of the air passages to help with the air redirection internal of the valve.

Next big hurdle in the valve. I need to kill blowback air. I found this perfect little brass doojiggy in a box of tool steel in my basement. I JB welded the doo jiggy into the blowback passage. and let it sit for a day. I also figure the 45* edge of the doojiggy will make a nice "jet" in the valve.


while the JB weld sets, I need to get the taper out of the valve pin. I happen to have a honing stone in my machinist stuff, so I used a hand drill, oil, and time to hone the pin down. I did use a flap wheel to get the high spot a ways down and save time.


This process took a lot of tries and re fits. oil, stone, turn turn, check, oil, stone, turn.
FINALLY after many hours I had the pin to a nice .0970"
I have a drill bit that measures .0965. I figure I can poke the hole with this, and stone the valve a little more until I get a tight fit.


The next day, I snuck down to the basement at 2:30 am, and drilled the doojiggy jet plug thingy, first with a tiny drill bit. then with my .0965 drill bit.
Fitted the valve from the front, but it bound form the ID of the valve body. I seem to have drilled my hole slightly crooked.

I determined, I would knock one of the valve fins off, and clock the valve pin to match my error. This allows the valve to deviate side to side more.

and Viola, it works!!!


Now My minds racing. how am I going to feed this beast with air? I consult with the tote of never ending remote lines. Oh tote, I wish I had a cool way to make my poo build direct air input.
Then the tote started to rumble. and this old school microline with a huge hex ASA appeared.

It was decided, the fat must be trimmed.


I put it quickly back together to ensure it holds air, and as you can see....
I dug my old V1 tippmann a5 bolt out of a bin. I recall upgrading years ago to the lower weight hammer for less recoil.. Well for this build a heavy hammer= dwell. and I assume I can get a super light hammer spring once I get on a chrono for testing. It also lacks the cocking lug which is better for astethics


*que more whirring noises*

Fast forward a few days. Life stopped all production once again.
I've been trying to brain my way around sledding the bolt linkage and seperating the hammer linkage. I knew it would require some iteration of an a5 cocking knob, but with a poo like spin. I made a few failed iterations of this from other parts, but eventually I fashioned this assembly out of scrap parts form my Walz built. The brass bar I hacked off, and filed square. then drilled and tapped to hold dthe bolt. The linkage is actually stainless hinge rod I had at work. The aluminum plate is 1/8" backplane scrap from work. but all in all it works pretty well!!!
The brass block is tapped 4-40 for the counter sunk bolt. The set screw is 10-32, and it what is affixing the bolt to the sled.


I excitedly put it back toghether and loaded a 12 gram. Here is how she looks today. Note the rosewood grip on the right side will need to be modified to fit, so I'm still deciding on stock grips vs the rosewoods. Feel free to provide feedback.


It's far from finished, I still have to work on designing and printing a cram and jam for it, and I want to make a pump handle that mounts to the bottomline rail to cycle the gun, but I could technically field it today.
It's no true test, but I was able to cycle 47 shots on the valve with a fresh 12ie before it was dead. I hope I am close to 30 good shots all said and done..
Stay Tuned!!!



Comment