POP 2026 - Poor Craftsman's Enmey

Collapse
X
 
  • Time
  • Show
Clear All
new posts
  • StaticShocked
    Certified Feline Herder
    • Jun 2025
    • 347
    • Indiana, USA

    #1

    POP 2026 - Poor Craftsman's Enmey

    It came in! I have named this the Pauper Fabrica Hostis, which if my latin from 20 years ago holds up, should mean the Poor Craftsmans Enmey. Here is what came in the box. I am very tempted to try to use that bolt... let the planning begin!

    Click image for larger version

Name:	20260326_184457.jpg
Views:	500
Size:	4.09 MB
ID:	815321
  • StaticShocked
    Certified Feline Herder
    • Jun 2025
    • 347
    • Indiana, USA

    #2
    Reserved for parts list. All prices include tax and shipping unless noted.

    Items ordered:
    3x Oring kits $16.04 total.
    Empire feedneck $21.35
    Macroline & fittings $18.07
    Stock Enmey barrel $10.06
    Enmey stock new bottom ASA $20 (original was corroded to heck).
    APP Clear Grips from clearance sale $1.33
    New Regulator Seat $2
    Planet Eclipse CS3 Bolt Soft Face $4.28


    Total: $92.85
    Almost there!

    Raw materials used:
    Carbon fiber tube, 18mm id x 20mm od , 330mm.
    Aluminum 6061-t6, 1" diameter x 1/2 long.
    2x 5/16-24 set screws.
    3D filament, both PLA and ABS. Not muc quantity so far.
    Last edited by StaticShocked; 04-13-2026, 07:01 PM.

    Comment

    • StaticShocked
      Certified Feline Herder
      • Jun 2025
      • 347
      • Indiana, USA

      #3
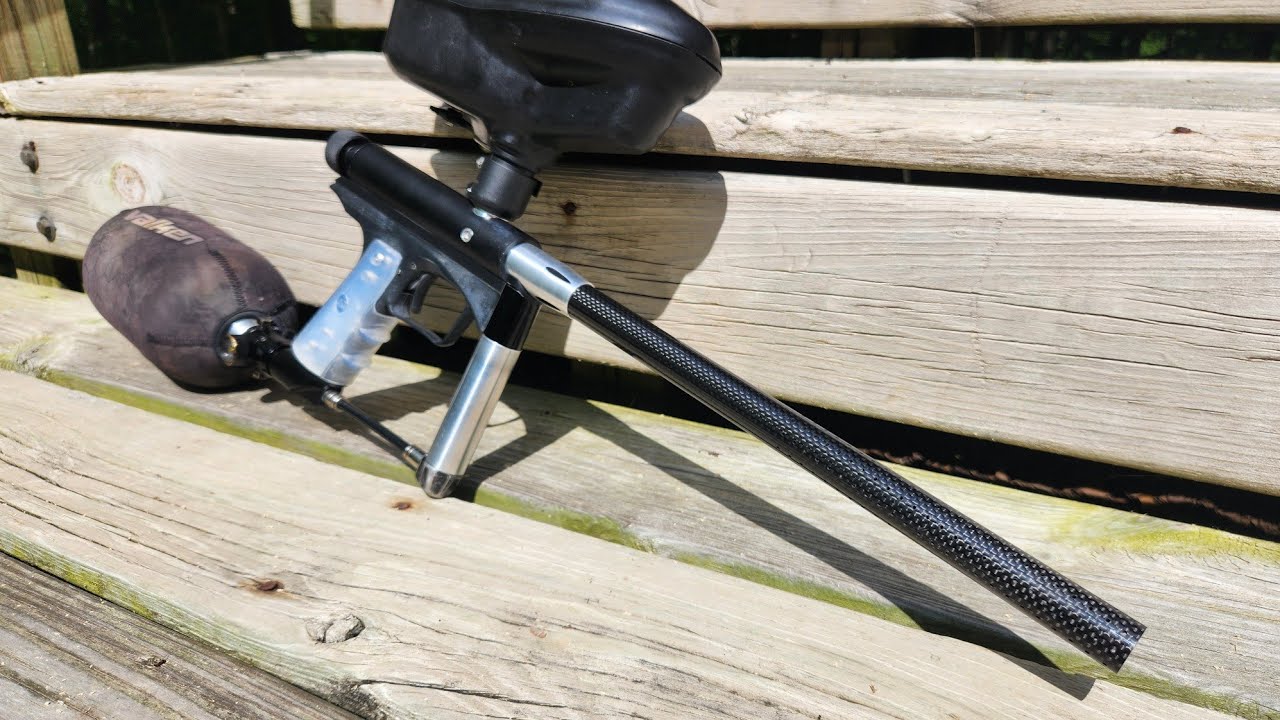
      It's time for the final result!

      Click image for larger version  Name:	20260529_160354.jpg Views:	0 Size:	3.01 MB ID:	841974 Click image for larger version  Name:	20260529_160340.jpg Views:	0 Size:	3.41 MB ID:	841975 Click image for larger version  Name:	20260529_160327.jpg Views:	0 Size:	3.50 MB ID:	841976

      Video:


      Last edited by StaticShocked; 05-29-2026, 05:43 PM.

      Comment


      • Calvin
        Calvin commented
        Editing a comment
        That soft tip bolt is fire! If it works well for you this summer I may have to start pressuring you for some cuts on a couple of mine. Nice work!
    • Calvin
      Old n' Quick
      • Sep 2025
      • 416
      • Home of the National Champion IU Hoosiers!!!

      #4
      Oh, man...that looks rough. Let me know if you run into a parts roadblock. I have spares.

      Comment

      • StaticShocked
        Certified Feline Herder
        • Jun 2025
        • 347
        • Indiana, USA

        #5
        Thanks! I am going to do your technique and just let it soak for a bit! The insides are sad.

        Comment

        • Calvin
          Old n' Quick
          • Sep 2025
          • 416
          • Home of the National Champion IU Hoosiers!!!

          #6
          It worked pretty well. I used a cooler as the soak tub. It was still too hot to hold my hand in 12 hours later. Still some staining in certain plastic parts that will never go away. I have 2 extra bolts in decent condition if you need to replace the bent one.

          Comment

          • Trbo323
            MCB Member
            • Jul 2020
            • 6358
            • Vancouver WA

            #7
            How the hell do you even do that to the bolt?

            Sent from my motorola edge 2024 using Tapatalk

            I use Tapatalk which does NOT display comments. If you want me to see it, make it a post not a comment.

            Feedback
            https://www.mcarterbrown.com/forum/b...323-s-feedback

            Comment


            • autococker04
              autococker04 commented
              Editing a comment
              That's a prototype Apex bolt for shooting around bunkers.
          • StaticShocked
            Certified Feline Herder
            • Jun 2025
            • 347
            • Indiana, USA

            #8
            Originally posted by Trbo323
            How the hell do you even do that to the bolt?

            Sent from my motorola edge 2024 using Tapatalk
            I dont know, i was trying to figure that out. But it made me laugh when i pulled it out of the box! (The marker has internals, including an unmodified bolt).

            Comment


            • RPP
              RPP commented
              Editing a comment
              "unmodified" lol
          • StaticShocked
            Certified Feline Herder
            • Jun 2025
            • 347
            • Indiana, USA

            #9
            Why is it that all of the decently priced, AKA cheap, barrels for ions are so bloody ugly? Can't a guy find a decent, good looking, $15 Barrel nowadays?

            Comment

            • Magmoormaster
              Only here for the zipline
              • Jul 2020
              • 1294
              • Glendale, AZ

              #10
              There's a decent looking SP Linear barrel on ebay for $20. I almost bought it myself.

              Comment

              • StaticShocked
                Certified Feline Herder
                • Jun 2025
                • 347
                • Indiana, USA

                #11
                Thanks! I missed that one!

                Comment

                • StaticShocked
                  Certified Feline Herder
                  • Jun 2025
                  • 347
                  • Indiana, USA

                  #12
                  Click image for larger version

Name:	20260330_180939.jpg
Views:	297
Size:	2.63 MB
ID:	817186
                  a $5 stock barrel, a carbon fiber tube, and a freak insert all walk into a bar...

                  Comment

                  • StaticShocked
                    Certified Feline Herder
                    • Jun 2025
                    • 347
                    • Indiana, USA

                    #13
                    Modified the stock barrel a bit. Cut it off and bored it to fit a carbon fiber tube, fit them together using epoxy, after it cured it was bored to fit standard freak inserts. This barrel may not even work. First time attempting this and i mainly just wanted to try this.

                    -Purchased carbon fiber, but that is a raw material (right?).
                    -Epoxy i had on hand.
                    -Freak inserts i am not counting as part of the marker since they are an accessory i use with multiple markers.


                    This weekend i hope to 3D print a drill guide for doing the porting. I will update once that happens.

                    My orings and macroline fittings showed up today! Tomorrow i can actually find out if i have a working marker or not, and what it will take to make work (praying for a working valve assembly).

                    Click image for larger version

Name:	20260401_193951.jpg
Views:	338
Size:	1.97 MB
ID:	818781 Click image for larger version

Name:	20260402_220831.jpg
Views:	303
Size:	1.64 MB
ID:	818782

                    Comment

                    • StaticShocked
                      Certified Feline Herder
                      • Jun 2025
                      • 347
                      • Indiana, USA

                      #14
                      The good:
                      Orings installed and no leaks after i found the one i forgot. Only minor deburring of the internal components was necessary, just dings and such that would cut orings. Reg rebuild went ok and seat looked ok. Seams to hold pressure without climbing. Once i get a barrel on it and check velocities i will know for sure. Regulator was chock full of goop, rust, and debris, but somehow rebuilt and worked. Set reg to 160.

                      The bad:
                      My ASA is shot, the threads are so corroded that i cannot tighten the tank after the pin cracks the valve. So have to source a new asa. An on/off asa would be great but may be to far out of the budget.

                      The unknown:
                      i have two bodies and inner aluminum tubes that both seam viable. I am thinking i am going to modify one body to make it more like a mag rail as i like that look. This would require a feed neck solution and a way to hold the detents in place (or change to different detents?). I will figure that out next.
                      Attached Files

                      Comment

                      • StaticShocked
                        Certified Feline Herder
                        • Jun 2025
                        • 347
                        • Indiana, USA

                        #15
                        More progress this evening.

                        Turned the regulator OD to more closely match the VASA and save a little weight.
                        Click image for larger version

Name:	20260407_201210.jpg
Views:	265
Size:	2.24 MB
ID:	820816

                        Made some super short set screws to hopefully retain the detents. I would like to go bodyless so i am hopping this will allow the detents to be retained and still functional. I need to deburr them still.
                        Click image for larger version

Name:	20260407_191843.jpg
Views:	279
Size:	1.28 MB
ID:	820817

                        Made a feed neck stub to press into the "can" after i counter bore it. I am still unsure if a press fit by itself will be ok or if i should use epoxy as well. If i do use epoxy, how would that joint fair if it ever got anodized?
                        Click image for larger version

Name:	20260407_201257.jpg
Views:	290
Size:	1.16 MB
ID:	820818 Click image for larger version

Name:	20260407_201311.jpg
Views:	265
Size:	1.05 MB
ID:	820819

                        Comment


                        • tyronejk
                          tyronejk commented
                          Editing a comment
                          I like the detent screws. I may try that myself. Maybe it's a good excuse to finally get a rotary broach.

                          With the feedneck, I think epoxy may interfere with ano. A press-fit with green Loctite or something may be better but there are many more knowledgeable people here than me.

                        • devilzcall
                          devilzcall commented
                          Editing a comment
                          coonsider ano first, loctite/epoxy after. Or just see how the pressfit fairs and only glue it when it comes apart

                        • StaticShocked
                          StaticShocked commented
                          Editing a comment
                          Thanks. I will just press fit first and see how it fairs and if it fails use something that is reversible just in case after this POP2026 build is all done and over, i decide to send it to ano or do it myself with one of KMDPB's kits. Once i am out of the $100 budget restriction of course! Green loctite is a good idea and I do have some green loctite i could use if it does come loose before all is said and done and i think i could get that apart and cleaned up again (maybe).

                          Those set screws for the detents are 5/16-24 and modified until they are .088" thick with a .062" hex. I am eager to see if it works and how your implementation works if you go the same kind of route.
                      Working...